 |
 |
The time now is Fri Apr 19, 2024 7:24 pm |
 |
|
| Author
|
Thread |
 
|
|
64fairlame
Junior Member
Joined: 30 Aug 2009
Posts: 27
|
Infamous 64 "Frame Rot" repair thread. How to!
After searching for a while on finding "fix" instructions for the famous "64 front frame rail rot" repair....I've come up empty handed. The only thing I found was the Crites pieces and a few people who said they did it with the pieces and it worked! Some said the pieces sucked, and they made their own.
I'm going to photo document here my repair. I'm going to replace both front rails and the crossmember. The frame rail pieces look great, and they go back far enough for the sway bar mounts. The cross piece? not so hot. Its squared off, not rounded like OEM. You don't see it, so its not a big deal to me. Also a quick test fit; the crosspiece does not fit with aorund the ends of the frame pieces, so tweaking will be required.
I'm going to try and leave the tops of the OEM framerail in place, and cut away the sides and lower piece. I'd like to keep the inner fender/frame rail looking original. Once cut away, I'll cut the Crites piece to match. I will also install double plates, plug welded to hold things in place for a final alignment. I'm going to take lots of measurements, and use the swaybar mount holes and the LCA mounting holes to help with alignment prior to final welding. All welds will be gas shielded, MIG welded.
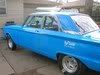
Here is what I'm starting with. Nice eh? the rest of the car is nearly perfect with 57K miles on it.

|
 Fri Sep 11, 2009 8:27 pm
 |
|
|
64fairlame
Junior Member
Joined: 30 Aug 2009
Posts: 27
|
Update 9/11;
Since I plan on detailing the engine compartment at the same time as doing the repair, the following items are now removed:
Front bumper, filler, headlight mount assys (rad. support is stripped bare), radiator (to be replaced), fan, generator, waterpump, fuel pump, air cleaners and pre-heater assy, shock tower struts, crank pulley. Essentially, the everything is cleared away from the rad support, back to the timing cover. That should give me enough room to work aournd the frame rails with no issues. The gas tank is drained, the fuel line is blown back with compressed air. I will also seal up and heat wrap the steel fuel line to make sure I dont' have any unwanted "flare ups" lol.
The hood is also removed, just so I can clean and paint th eunderside.
This repair is being done on a lift, so getting under the car is optimal. Doing it on jackstands would be somewhat more difficult, but do-able.
|
|
Fri Sep 11, 2009 8:34 pm |
|
|
1320lane
Senior Member

Joined: 17 Mar 2006
Posts: 270
Location: Central Oklahoma |
I think mygirls63 did this on this site.
_________________
Larry Hampton
______________________________________________
'63 Fairlane 2-dr post. Race car since at least '67. In the process of turning it into a proto-clone Nostalgia Super Stock car with FE power and three pedals.
|
|
Fri Sep 11, 2009 9:50 pm |
|
|
64fairlame
Junior Member
Joined: 30 Aug 2009
Posts: 27
|
quote:
Originally posted by 1320lane:
I think mygirls63 did this on this site.
I searched out and found that thread. He removed the entire rail back under the shock tower. I'm not going to do it that way. I'm going to TRY and keep the top half of the existing frame rail. That should keep the alignment task easier.
|
|
Sat Sep 12, 2009 7:26 am |
|
|
|
|
|
|
|
|
mygirls63
Senior Member
Joined: 09 Mar 2006
Posts: 416
Location: Kansas |
Do you have the sway bar link kits and bushings for the control arms?
I purchased a Kantor kit and did not use these items. If you need them, I will make you a nice deal.
_________________
Scott
1963 Fairlane Mini tub 10pt cage New 408" C4 Canfield 195CC heads Comp solid roller Victor Jr. 9" w/4.11? gears Moser spool & 35 spline axles. www.marksullense85carburetors.com
|
|
Wed Sep 23, 2009 6:25 pm |
|
|
|
|
|
|
|
|
|
Forum Rules:
You cannot post new topics in this forum
You cannot reply to topics in this forum
You cannot edit your posts in this forum
You cannot delete your posts in this forum
You cannot vote in polls in this forum
|
|
|
|
|
|
 |
|
 |
|


